
Quickstart
Tagging your first 3D asset using our public API
This guide will get you started with tagging your first asset using our 3D Tagging API. For a no-code way to try out our tags, visit our Playground.
1: Sign up for a Loci account
If you haven’t already, sign up for an account with Loci. Each account is preloaded with 100 free credits, so you can get started straight away.
2: Grab your API key
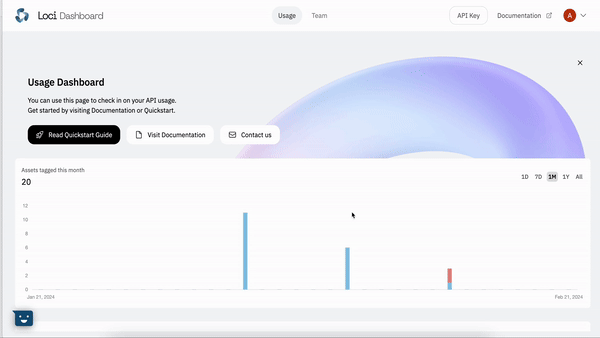
To make a tagging request, you will need your API key. Once logged in, you will be able to find it on the top right of the Dashboard.
3: Tag your first asset
Loci supports a wide range of 3D asset types. You can find out more about what our 3D Tagging Endpoint supports here.
We will now send a 3D asset to our endpoint for tagging! If you don't have one handy, you can find a nice variety of assets available for free download here.
We will be sending the asset to our tagging endpoint at https://loci-api.com/tag/tag-3d-asset. Our endpoint supports both direct asset upload, and linking to external (pre-hosted) asset URLs. For the purposes if this tutorial, we will be using the direct upload functionality. You can find the full specification of our tagging endpoint here.
Below are prepared code snippets for Python, Node.js and C#, where we send an asset to our endpoint, being sure to set our API key in the header using x-api-key.
from pprint import pprint

import requests

API_URL = "https://loci-api.com/3d/tag"
API_KEY = ""  # your API key
ASSET_FILE = "/path/to/my_asset_file.glb"

with open(ASSET_FILE, "rb") as file:
    response = requests.post(API_URL, headers={"x-api-key": API_KEY}, files={"file": file})

pprint(response.json())
const fs = require('fs');
const path = require('path');
const axios = require('axios');
const FormData = require('form-data');

const LOCI_API_URL = 'https://loci-api.com'
const LOCI_API_KEY = 'YOUR_API_KEY'

const sendApiTagRequest = async () => {
  const filePath = path.join(__dirname, 'asset_file.glb');
  const fileBuffer = fs.readFileSync(filePath);

  if (fileBuffer) {
    const formData = new FormData();
    formData.append('file', fileBuffer, {
      filename: 'asset_file.glb',
      contentType: 'model/gltf-binary'
    });

    try {
      const response = await axios.post(`${LOCI_API_URL}/3d/tag`, formData, {
        headers: {
          ...formData.getHeaders(),
          'Content-Type': 'multipart/form-data',
          'x-api-key': LOCI_API_KEY
        },
        responseType: 'json'
      });

      return response.data;
    } catch (error) {
      console.error(error.message);
      throw new Error('Error sending API request: ' + error.message);
    }
  }
};

sendApiTagRequest().then((response) => {
    console.log(response);
});
If you want to send a link to a file directly instead, it would look like below:
from pprint import pprint

import requests

API_URL = "https://loci-api.com/3d/tag"
API_KEY = ""  # your API key
ASSET_FILE_PATH = "https://loci-playground-demo.s3.eu-west-2.amazonaws.com/shib.glb"

response = requests.post(API_URL, headers={"x-api-key": API_KEY}, data={"url": ASSET_FILE_PATH})

pprint(response.json())
In return, we will send you back the tags for your asset, in the format below:
{
  "filename": "my_test_asset.glb",
  "tags": [
    "mythological creature",
    "fantasy creature",
    "superhero",
    "jumpsuit",
    "standing",
  ],
}
It's that simple to start tagging with Loci! Our 3D tagging endpoint also supports the addition of extra contextual data, such as images and text. For a deeper dive into our API, you can view our Public API Documentation or Tutorials Section.
While our freeform tagging API is the perfect fit for many use cases, there are instances where may wish to tag your assets with specific classes through the use of customised taxonomies. You can read more about our Custom Classification product here.
Updated 10 months ago