
Using Loci with Algolia Search
How to leverage Loci's data to power Algolia search
Algolia is a powerful and flexible hosted search engine capable of delivering real-time results. Combined with the detailed tags and metadata for 3D assets provided by Loci, it can be used as a powerful engine for real-time asset search and discovery, no matter your collection size.
This guide assumes you are starting from scratch, and currently do not have Algolia database setup. If you do, you can skip to Step 4.
Though this guide is written in Python, the concepts are generic and can be applied with any language.
Step 1: Setting Up Your Algolia Account
Sign up at Algolia's website and set up an application to get your Application ID and Admin API Key.
Step 2: Install Algolia's Client
Install the relevant Algolia client for your environment. For Python, this would be:
pip install algoliasearch
Step 3: Configure Algolia in Your Script
from algoliasearch.search_client import SearchClient

client = SearchClient.create("YourAlgoliaApplicationID", "YourAlgoliaAdminAPIKey")
index = client.init_index("your_index_name")
If preferred, you can also create and configure your index through the Algolia dashboard.
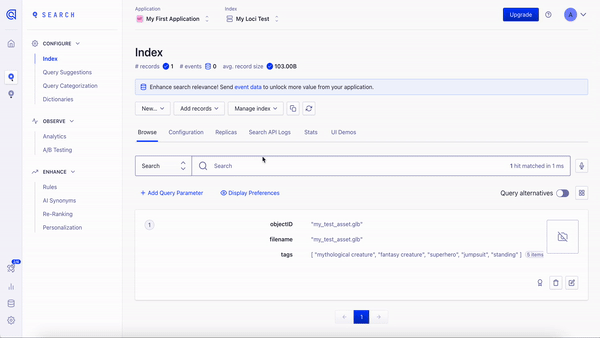
Step 4: Tag your asset(s) with Loci!
It is now time to tag the assets that we would like to add to our Algolia index! You can find an example of a call to our API which tags an asset stored in /path/to/my_asset_file.glb in the script below:
import requests

API_URL = "https://loci-api.com/3d/tag"
API_KEY = ""  # your API key
ASSET_FILE = "/path/to/my_asset_file.glb"

with open(ASSET_FILE, "rb") as file:
    response = requests.post(API_URL, headers={"x-api-key": API_KEY}, files={"file": file})

data = response.json()
For more information on using our API, you can view our Quickstart guide or API Documentation.
The response from our API, which we store in data in the above snippet, will be delivered in the format below. For the purposes of this tutorial, we will be focusing on the returned filename and tags, as these are what we will be using in our Algolia index.
{
  "filename": "my_test_asset.glb",
  "tags": [
    "mythological creature",
    "fantasy creature",
    "superhero",
    "jumpsuit",
    "standing"
  ]
}
Step 5: Save your data to Algolia!
The last step is for us to add our new asset data to our Algolia index.
index.save_objects([{
    "objectID": data["filename"], # Ensure your objectID is unique for each asset entry
    "filename": data["filename"],
    "tags": data["tags"]
}])
With Loci, it's that simple. Your asset will now be searchable within Algolia, both with its filename and assigned tags.
Updated over 1 year ago